Valentine Smooches Sneak Peek
January 1st, 2009
So what do you think of the SASI sneak peeks so far? Those calendar sets are stinkin’ CUTE – that’s for sure. Can it get any cuter? Well…who can resist the ultimate papercrafter’s holiday? Yep – today the entire Bakers Dozen team is showcasing the new SASI Valentine set Love is Sweet! Oh be still my heart!

I’ve used two of the cuppies from the set (Love Muffin and Cupid). Don’t you just want to eat them up? LOL! On the left is a small paper mache box I picked up at Hobby Lobby in Texas. It already had a square hole cut out of the lid – just perfect to make into a shaker top. On the right is a little 3×3 love note to go along with the sweet little gift box. And here’s the inside of the note.
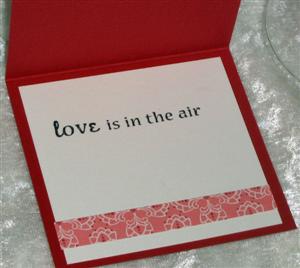
All three of the sentiments I used are from the Love it Sweet set as well.
Just as I was getting started on these SASI projects my Stampin’ Up! Demonstrator pre-order arrived. Oh the agony of so many stamps, so little time! I just had to use something out of that SU box, so I decided to use this fun new Raspberry Tart dp. I covered both the top and bottom of the box with the dp. Then I stamped the Love Muffin onto TE Choice White cardstock and paper pieced his wrapper and colored the rest with Copics. That was then adhered to a chipboard square that came with the box. I attached a panel of acetate inside the lid to cover the hole and over that I layered foam tape around all 4 sides of the window – making sure there was no place for my tiny little beads to escape. After carefully pouring in some of this very fun bead and confetti mixture I attached the image panel to the foam tape on the inside of the lid. I stamped my sentiment in real Red and punched it out with the SU Word Window punch – I love how so may of the SASI sentiments fit into punches I have. Then I added some pink Zva crystals (also from TE). I think this box would be perfect to fill up with Hershey Smooches Kisses or perhaps a piece of pretty jewelry if you wanted to kick it up a notch.
Since there was so much going on with the box I decided to keep the coordinating card quite simple. Again I paper pieced the cupcake wrapper, punched the sentiment with the WW punch and added the same crystals just in a larger size.
Be sure to check back tonight at 9:00pm Pacific or midnight EST for the big SASI release news and even more samples from the team! For now let’s hop over to Taylor’s blog to see what she has for us today and to navigate to the rest of the Bakers Dozen peeks! What a fun way to start the New Year!

SASI New Year – Sneak Peek Time!!!
December 31st, 2008
WooHoo! The time has finally come when we can share sneak peeks of the upcoming Stamp a Sweet Impression release. Friday January 2nd will mark the most extensive release in SASI history so strap on your seatbelts! My sneek peek project for today is from A Year of Sweets 2 (yes that means there’s more than 1 of these sets!) and it’s a page from the brand new perpetual calendar that will also be available at Taylored Expressions. I’m especially excited about the perpetual calendar because I helped to design it. *bouncin’ in my chair*
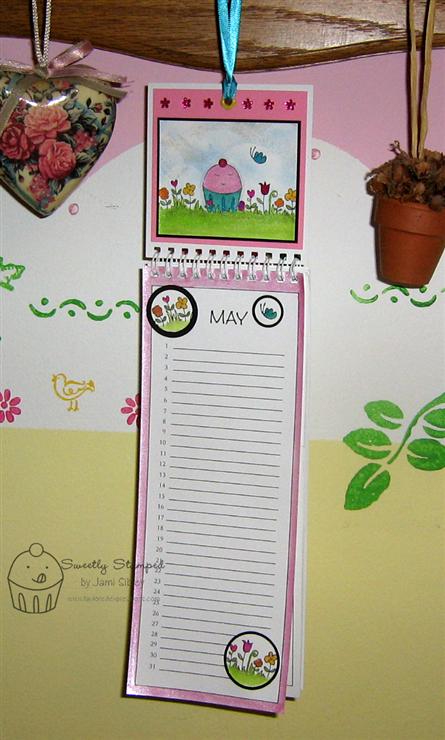
There is a blank panel that can be decorated for each individual month on the calendar and that panel folds down to reveal a new one as the month changes. The thing that had always bothered me about other blank perpetual calendars I have seen was that it tends to be difficult to design for a long skinny panel. I wondered for a long time why someone didn’t make one with a smaller, easier to decorate panel on top…and now here it is!! Can I get a *WOO HOO*?
The scenes in the A Year of Sweets series are designed to fit nicely on this calendar as well being the perfect size for cardmaking. You could easily stamp the scene image directly onto the calendar panel, but I chose to do just a little bit of layering this time. There is a hole already punched in the top of each panel and you could simply hang the calendar on a nail through that hole, but I added a flower eyelet (retired SU) as well as some ribbon so the calendar could hang from a knob. That’s my stamp room wall in the backround. I apologize for the picture quality as our Canon Rebel is on the fritz and I’m using our point and shoot which I’m not as familiar with.
Perpetual calendars make great gifts any time of year since everyone has birthdays, anniversaries and other important family rememberances to keep track of. You’re going to want to pick up several of these when they become available on Friday.
When I started this project I thought about what I could do that might be fun and different. I’ve been using Copics so much lately, that I thought maybe I should try watercolor instead…and then it hit me…why not drag out my Twinkling H2O’s that I haven’t used in ages? 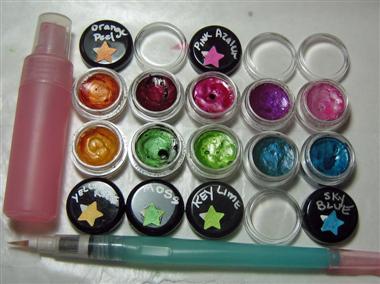 I love Twinkling H2O’s and I just wish you could really see the shimmer – there’s just no way to capture it in a photo. If you’ve never used them, they are little cakes of super shimmery/twinkly watercolors. You simply take off the lids and place the little pots onto a tray or sheet of wax paper and mist them with water. Wait a couple of minutes to let them soften up and then paint with them using a watercolor brush. You can also mix colors on a palette or a CD.
I stamped the image on Taylor’s brand new awesome Choice cardstock with Memento Tuxedo Black ink and colored with the Twinking H2O’s. I stamped the image a 2nd time and colored just the flowers and butterfly and punched them out with circle punches to be added to the bottom portion of the calendar. I also painted with Twinkling H2O Cherry Sorbet around the entire outside edge of the bottom portion of the calendar using Eclipse masking tape for a clean line. The cuppie was also masked with Eclipse so I could sponge the sky with my SU cloud template and Bashful Blue ink. Then I also sponged on a bit of TH2O’s.
Here’s a close up of the scene.

Here are the layering measurments for your reference in case you want to decorate one of these calendars in a simlar fashion –
Image layer – 3-1/4 x 2-5/8
Black layer – 3-3/8 x 2-3/4
Pink Layer – 3-5/8 x 3-1/2
Project Recipe:
Stamps – A Year of Sweets 2 (just one stamp is used here)
Cardstock – TE Choice White, Basic Black, Pink Prism from Christmas Key Ingredients
Ink – Memento Tuxedo Black and SU Bashful Blue
Other – yellow flower eyelet (SU retired), dark pink Kaiser Craft rhinestone flowers, SU cloud template (retired), circle punches, teal ribbon.
Twinking H2O colors – mystic blue, sky blue, key lime, moss, yellow rose, orange peel, ruby red, pink azalea, jasmine, cherry sorbet.
I can hardly wait to see the Sneak Peeks from the rest of the Bakers Dozen! Let’s hop over to Taylor’s blog to see what she has today and from there we can visit the rest of the BD team as well! I’ll be back tomorrow morning with another sneak peek so be sure to come back! And then the big release is January 2nd at midnight (which is Thursday at 9:00pm for those of us on the West Coast). So put us in your schedule now so you don’t miss a thing!
Cocoa Cones
December 16th, 2008

Two parties in one day! I’m off to work and our office Christmas breakfast at Mimi’s. We’ll come back from breakfast and work for awhile and then have an appetizer potluck and a Grinch Gift Exchange.
Then as soon as I get home I need to put together a broccoli corn casserole and a sweet potato casserole and get them baked so I can take them to my prayer group annual Happy Turkey Dinner. This is always one of my very favorite nights of the Christmas season.
Before I’m out the door to work, I wanted to show you the little gifts I have for everyone in my office. I found these cocoa cones all made up complete with red satin bow at Costco.

I simply removed the tags that came on them and added some quick and cute tags made from elements of the TE Christmas Key Ingredients set along with the tags from TE and a sentiment from SASI Season’s Sweetings. The sentiment was punched out with my SU Key Tag punch. When I’m in a hurry I find that punching out sentiments is so much faster than getting them lined up straight directly on my project. Boy – those TE tags have come in so handy for so many things! I just used up the last of my supply. I’m going to need to get some more to have on hand for sure!
Yesterday I broke a tooth and I have an appointment tomorrow morning to get fitted for a crown. In the meantime I need to be really careful about chewing, so it’ll be a big bowl of oatmeal for me at Mimi’s this morning. Good thing I love oatmeal!
Thanks for stopping by. Have a great day!
Big Birthday Card
December 13th, 2008
The very last piece to the Divine Design gift set I’ve shared throughout the week is the birthday card. I really had fun with this one…so much fun I got carried away and made it bigger than the envelopes I have. LOL! It’s 5.5″ square.
I knew I wanted to use some of the Cosmo Cricket Honey Pie paper to coordinate with the set and this striped berry pattern is one of my very favorites of the collection. The orange paper is the solid side of one of the patterns. I stamped the birthday image from Sweet Celebration by SASI on Poison Ivory shimmer cardstock and paper pieced the cake and the cuppie’s cupcake liner. The rest was colored with copics. Then I cut and embossed the image with a Nestabilities Label 1 die and with the die still in place I sponged on Sage Shadow ink. Then I got to work with some fun and sparkle adding some embossed Prima flowers with an orange rhinestone brad center, some frilly stretchy ribbon I picked up at Hobby Lobby in Texas and some Zva Creative pink crystals. And for just an added punch I added Dazzling Diamonds glitter to the cake as well as to the edges of the sage layer and the orange label layer. I did this with a Sakura Quickie Glue pen. It’s a little hard to see in the photo, but oh-so-sparkly IRL.
Of course I had to finish off the inside of the card as well.

The little flower stamp is from SU Roses in Winter. I just don’t know if I’ll ever give up that set! I have to say that it’s so fun to pull color combos from different designer papers. I end up using combos I wouldn’t come up with on my own. In this card we have a pink Prism cardstock (similar to Pretty in Pink) along with Regal Rose, Sage Shadow and the orange dp (closest to Apricot Appeal). I think it’s so feminine and fresh looking!
I have a confession to make. And once I’ve made it, I hope you’ll still love me! We got the photos from Megan and they’re awesome! So last night we went on-line to order some wallet sized photos to include in our Christmas cards. I need 100-120 cards in total. I have sent out hand made cards every year for probably the last 10 years or so. I have sometimes had to supplement with one box of store-bought cards (oh the horror), but even in the very stressful years of my aunt’s illness I managed to get mostly hand made cards mailed out. This year I’m about 2/3 or maybe even 3/4 of the way to having my cards finished. So when we were ordering photos I said “hey why don’t we order a set of 20 photo cards to supplement what I have made?” Curt was fine with this idea – I’m the one who has a major problem with photo cards. Don’t get me wrong – no offense to those people who send them every year – I realize they can be nice – but often they just seem to have nothing to do with Christmas and they aren’t even hand-signed usually….and well….it’s just my own personal problem and love of beautiful or adorable traditional Christmas cards….yes I realize I’m rambling….so I’ll just spit it out…we ended up ordering 80 of the photo cards. Yep…80! We’ve just never had such a nice photo of us (thanks Meg!) since our wedding (which btw – was the ONE year we did send out photo cards)…and I was feeling overwhelmed with it being so late and still having work to do on Christmas cards. So a few people will get hand-stamped cards, but most will get a photo card this year. I feel like I’ve broken a one of my own cardinal rules, but I hope you’ll still love me…in a stampin’ kinda way! I promise to have all hand-stamped cards ready to go by the beginning of December in 2009!

Caroling Cuppie for TECC45
December 5th, 2008
Happy Friday! 
It’s time for another Taylored Expressions Cupcake Challenge (cupcakes NOT required to play) and this is sketch #45 in the series. Click here to get all the deets and play along with us. You might even be chosen as Taylor’s Featured Cupcake Sampler next week. This week’s Featured Stamper is Cindy Lawrence at The Creative Closet (One Happy Stamper on SCS). I know you’ll have great fun checking out her blog!
For today’s sketch I had my TE Christmas Key Ingredients Kit sitting out from yesterday’s card and felt like I just hadn’t played with it nearly enough yet. I just love the color combos in this kit. One of my favorite papers is the tree design and I thought it would make the perfect background for this card, so that’s where I started.
Next I looked at all the images in my SASI Christmas sets and decided to use Carole from Home Sweet Home as 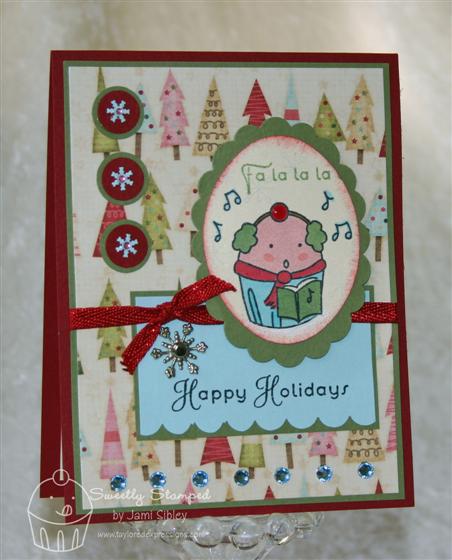 my focal point. I stamped her on Poison Ivory cardstock and colored her with Copics before punching her out with a Marvy oval punch and adding some sponging. I created the three circle embellishments with 2 SU circle punches along with a teeny tiny snowflake punch from the dollar bin at Michael’s (those dollar punches work surprisingly well!) and a teeny tiny pink rhinestone (Taylor Twinkles – rumored to be back in stock soon *wink*). Along the bottom edge of the card I used blue Kaiser Craft rhinestones (also from the KI pack) – I actually used a ruler to make little 1/2″ marks to get them spaced evenly. The ribbon is red and sparkly and from the KI as well. The cherry is covered with a red rain dot – I love those things! The metal snowflake was in my stash – I think I got it at Paper Zone on my trip to Portland last year.
I really love the yummy deep red color of this Prism cardstock in the KI pack (so ahrd to really capture in a photo!) and I’m really glad that Taylor has started to carry these Prism cardstocks in single color packs, so when I fall in love with one in particular from a KI pack I don’t have to be so afraid of running out!
And here’s a picture of the inside of this card.  For the snowflake circles I punched the snowflake out of the blue cardstock (for the front of the card) and then I just centered the snowflake in my circle punch (holding the punch upside down) and punched out the circle. I added a clear tiny rhinestone in the center.
Now let’s see what the rest of the Cupcake Crew has cooked up this week:
I’m off to a hair appointment and then I need to buckle down and work on some gifts and Christmas cards today. I know – *poor me* huh? LOL! I hope you have a great day and a wonderful weekend. Thanks for stopping by!
Frosty for SC203
November 19th, 2008
It is SOOOO good to be home! No matter how much I love a vaction I’m always glad to get home! I woke up with a bit of a sore throat so I stuck around the house today doing laundry and such. I’ve been dying to stamp so I had decided last night that I would make time today to sit down and do the SCS Sketch Challenge. It was a fun layout to work with.
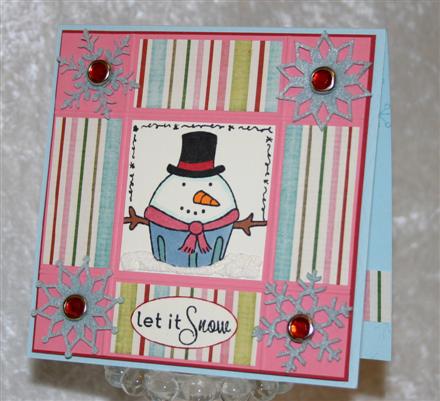
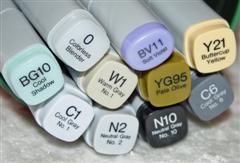
My card is 4.25″ square and the focal point is Frosty from Home Sweet Home a Stamp a Sweet Impression set by Taylored Expressions. He was stamped with Memento Black ink on Choice Natural White cardstock (from TE) which is a soft ivory/vanilla color. I colored hom with the Copics pictured below to coordinate with this fun designer paper from the Christmas Key Ingredients pack. 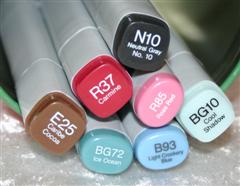 The snow under Frosty is white Liquid Applique covered with Dazzling Diamonds glitter and then heated to puff up.
I started this card with a 4″ square panel of Regal Rose cardstock and using my Scor-It I scored lines 1″ from each edge all around. Then I adhered the strips of dp and the focal image. The Rose panel was then layered onto a Riding Hood Red panel cut just 1/16″ larger. Felt Flurries (SU) snowflakes in Baja Blue were added along with red rhinestone brads. The sentiment (from Home Sweet Home) was stamped and punched with the SU small oval punch. I was going to layer it onto a Riding Hood Red large oval, but it didn’t look quite right, so instead I simply scraped the edge of the small oval in the RHR ink pad to give it a bit of a faux-layered look. The Rose/Riding Hood Red panel was then adhered to the blue (cardstock from Key Ingredients) base using foam tape.
The inside of the card was finished off with snowflakes and a strip of dp along with the sentiment.
Be sure to check out the cute creations over on the SASI blog! And if you’d like to be considered for Our Friday Friend over there, be sure to upload your SASI creations to the SCS gallery using the keyword SASI.
I want to give a HUGE SHOUT OUT and offer my heartfelt congratulations to my friends Joy and Cami and their partner Kimberly on the launch of their new stamp company Our Craft Lounge! Have you seen their stuff yet? I’m so excited for them and proud of all they have accomplished in a short time. You ladies ROCK! Sorry I’m so late to the party! I don’t have the sets I ordered yet, but I hope to play with them soon!
It’s back to work for me tomorrow. Thanks for stopping by!
TECC40 Happy Halloween
October 31st, 2008
And here it is…my LAST Halloween card! WooHoo!!! Happy Halloween!

Have I mentioned that I really don’t care much for Halloween? You’d never know it from looking at my blog over the last few weeks. LOL! I have truly enjoyed playing with both Anna’s Whipper Snapper and Taylor’s Stamp a Sweet Impression Halloween images – fortunately they are all super cute – but I am officially Halloween’d out!
That being said, I have to admit that I had a blast creating the little scene above and I think it may be my fave of all the Halloween cards I’ve created. (Of course my most recent creation is often my fave – LOL) This week’s sketch ROCKS! It’s so versatile – I’m sure I’ll be using it again. I started by stamping and masking Vampy from Trick or Sweet and then adding all the other images from Frightful Night. I then colored everything with the Copic markers pictured below.
Vampy has a red pearl for his cherry and a little clear rhinestone for his cape clasp (both Kaiser Craft). The ghosts are outlined with Dazzling Diamonds glitter. I don’t have a black Copic, but N10 seems to work just fine for most things I would use black for. The card base is Kiwi Kiss and I stamped the tiny ghost along with the little stars (Frighful Night) in Kiwi ink for a tone on tone background. The dp is SU and I used a bit of black cardstock for matting. Some black diamond stickles on the sentiment and some pumpkin grosgrain ribbon knotted on the left side are the finishing touches.
So you want to play along, right? Check out Taylor’s blog for the sketch and all the deets to play! And now let’s see what the rest of the Cupcake Crew has cooked up:
And this week’s Featured Cupcake Stamper – Mary Fish at Stampin’ Pretty.
What are your Halloween plans for tonight? Oddly enough I’m hoping to work on Christmas cards. Can you believe it will be November tomorrow? November!!!! Yikes – this month has flown by! And don’t forget about the time change Saturday night…an extra hour to sleep Sunday morning – yea! Have a great weekend!


