Favorite Recipes Tin
May 16th, 2008
This week I worked for a couple of days on a little bridal shower gift. It’s a recipe tin made from a Provo Craft mini top load tin (the same type of tin I’m using for my monthly Bible Verse Challenge cards). I’m so pleased with how it turned out.
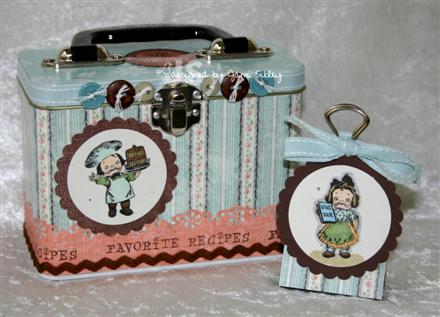
It’s covered in Afternoon Tea designer paper by Stampin’ Up! I used Mod Podge (I prefer Royal Coat by Plaid, but I was completely out). Normally when I cover a tin I prefer to use the Mod Podge only to adhere the paper, but since this will be used in the kitchen around food I decided to give it a top coat of Mod Podge also to protect it. The cute little quewpie cook images are from Crafty Secrets Kitchen Classics set and I colored them with Copic markers. The images were punched with Marvy circle punches (super jumbo layered onto scalloped mega). The border at the bottom was created with a Martha Stewart border punch. Next I added a brown nylon ric rac (thanks Linda for the idea to cut the sticky strip to half width – I was stumped as to how to attach that ric rac). The idea for the buttons was inspired by a tin done by Lana Lepinski. I love taking inspiration from great stampers like that! I didn’t have any brown buttons so I colored two bashful blue buttons with a Copic – very handy! I used Soft Sky stitched ribbon around the top edge of the tin.
I also made a binder clip recipe holder. So quick to make, but a really nice addition I think. And for the inside of the tin I made six dividers. The tabs are left blank so the bride can write in the categories she wants based on what recipes she receives at her shower.
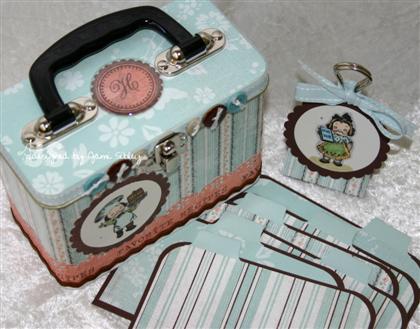
On the top of the tin used Paper Trey stamps to create a monogram and covered it with an A Muse clear round sticker.
Stampin’ Up! has a really cute recipe card stamp set. I’ve wanted it for awhile, but wasn’t sure I would use it. I’m thinking these recipe sets would make nice Christmas gifts so I’m going to look at that set again from a new perspective. It would be great to make recipe cards to go in a tin as well. I do love this Crafty Secrets set and there are so many possibilties with it.
I hope you have a fantastic weekend. Thanks for stopping by.

Long Note Ronnie
May 15th, 2008
So…it’s been a bit of a bummer day. Curt’s really nice cell phone (a Tilt) that he’s only had a few months was stolen today. He did a ton of research before he got that phone and he got a really great deal on it – it will be expensive to replace but thankfully we have some money set aside from his bonus for some special purchases. Not the end of the world, but very frustrating. I just feel really bad for him.
On a brighter note I have a fun card to share – it features my very favorite My Friend Ronnie image available at eclectic Paperie.
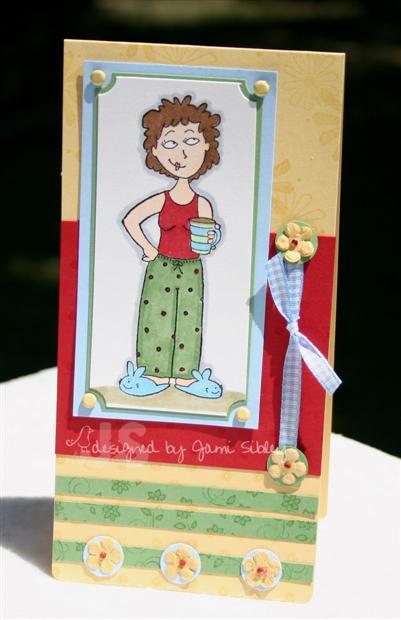
She is just soooooo me! I love to hang out in PJs and fuzzy slippers and a cup o’ joe makes it all just perfect! Whenever I see this image I always think of the caption “Hmmm….go to work or stay home and stamp?” I really want to get that sentiment made into a stamp! I can think of lots of people I could send it to. LOL!
This is another image I colored with Copics while watching a movie awhile back. When I first starting working on putting this card together I had some Cutie Pie dp all cut and ready to use, but it just seemed too busy so I backed off and decided to just use cardstock and stamp some background images. I used a So Saffron long note from SU (retired) as the card base and then just really had fun with the details. On the top portion I wheeled the Solitude wheel from the hostess bundle and on the bottom portion I used one of the images from Boho Backgrounds. I cut 1/4″ Wasabi strips and stamped them with another image from Boho Backgrounds. The Real Red panel is stamped with the SU background stamp Polka Dots. Many of my favorite embellishment ideas come from trying to cover up something. In this case I had the card assembled when I decided to add the ribbon so I punched holes in the front of the card with a handheld rectangle punch. This gave me the perfect place to put the blue gingham ribbon, but I didn’t like the way the holes looked so I played around with how to cover them up. I ended up with these 1/2″ circle punches covered by tiny Prima flowers and really tiny red rhinestones.
For me it seems like the joy of stamping is all in the details. Making this card made me really happy. 🙂 I hope you like it too. Thanks for stopping by.
Another Doggie
May 14th, 2008
I totally didn’t even realize I was posting two dog cards in a row until I sat down to actually type up this post. I stamped two cards this morning – both using images I had colored with Copics a couple of weeks ago – and today I wanted to share the one I did for the SCS Sketch Challenge. Just so happens to be another doggie card. For some reason I love cute dog stamps – we don’t even have a dog! LOL! Anna Wight’s dog stamps are some of my faves and oh my I just now discovered that her new set this month is Good Dog! Just last week I put myself on stamp restriction and now my head might explode. AAACCCCKKKK! It’s not that I can’t afford to buy stamps – I have money in my stamping account – it’s just that I have sets I haven’t even inked and I told myself until I start stamping more (as opposed to just thinking about stamping – LOL!) that I need to hold off on buying any more sets – especially anything unmounted since I tend to use those waaaay less than my wood mounted sets. Like I said AAACCCCKKKKK!
Well here’s the card I made this morning using one of Anna’s single Whipper Snapper images.

I experimented this morning with taking my photos outside in natural light. It was pretty bright out and I’m not convinced that I got an overall better result – I’m not liking the big shadow under the wasabi ribbon, but the colors are probably a little more true.
After coloring the dog with Copics I used the Colorless Blender Pen in a pouncing motion all over him to create a bit of a textured look. I picked up that trick from Marianne the Queen of Copics at her demo/class at CHA. The background stamp I used is Geometric Flowers II designed by Lisa Strahl for Cornish Heritage Farms. It was stamped in Chocolate Chip ink on Close to Cocoa cardstock. The designer paper is SU Afternoon Tea. The sentiment is Elzybells. Jewels at the bottom are Adorn It Jewel Droplets from eclectic Paperie (they seem to be out of stock at the moment and I’m getting the shakes as I need to replenish my supply!) The little cocoa droplets around the sentiment are Scribbles Irridescent 3D Paint in Golden Brown (just like liquid pearls). Wow – I guess this was really an equal opportunity card! Pieces and parts from everywhere – just had fun playing!
Shopping Alerts!
- Tuesday Morning just got a shipment of Fiskar’s Rotary Cutters (12″) in and they are selling for $19.95. I have a Fiskar’s Rotary I’ve used for years and it’s finally gone wonky on me over the past several months. But I had no complaints with it at all for many years. I just purchased the SU Tabletop Cutter. It cuts like a dream – I am just getting used to the guillotine style (I resist change, you know!) I almost went ahead and bought a Fiskar’s at Tuesday morning today for that great price, but I managed to talk myself out of it.
- Taylor has shared a sneak peek of her new kit to be released on May 20th. Check out her May 13th blog post!
It’s been a busy day and I have one more errand to run before dinner. I’ll be back sometime tomorrow to share the other card I created this morning. Thanks for stopping by.
Dad’s Turn
May 11th, 2008
I promised to come back and share the birthday card I made for my Dad. I used Taylor’s Friday Challenge for the layout of this one. I’m sorry – it’s not the best photo. I was in a rush to get this picture taken and get the card stuffed in the envelope before dinner last night.

Taylor’s sketch called for a rectangle shape for the focal point, but I had this adorable dog (Whipper Snapper I think?) in my stash of stamped images from get-togethers with friends and I had already punched it with my Marvy Mega Oval Punch, so I improvised. I chose the retired SU designer paper Tree House and colored the image with Copics to coordinate. The grass-like border is Doodlebug Designs Paper Frills – it was white and I colored with a Copic Marker (YG97 Spanish Olive). The brads are a chocolately brown from Amercian Crafts. The cardstock is Mustard along with retired colors Buckaroo Blue and Cranberry Crisp. The sentiment is from Simple Sayings II – that is one of those old sets I can’t imagine ever gettind rid of!
So there you go…a *guy* card can still be cute. They don’t always have to be boats and horses and totally serious! LOL! Hope you had a great weekend. Thanks for stopping by!
Mother’s Day ’08
May 10th, 2008
I hope you’re having a wonderful weekend. This evening we celebrated both Mother’s Day and my Dad’s birthday with my parents by going to Ruth’s Chris Steakhouse. Beef! Yumm!
Thought I’d stop by before bed to share the card I made my Mom for Mother’s Day. I got Spring Solitude not too long ago and wanted to use it. When I saw Beate’s Weekend Sketch Challenge I thought it would be perfect! The large flowers in this stamp set reminded me of this retired SU designer paper, so I pulled it out. Funny thing is – I ended up not even using that stamp from the set. Oh well. Once I had my stamp set, the sketch, and my paper this card came together fairly quickly. I love this sketch (thanks Beate!) so I’m sure I’ll be using it again!
I’m still using my Marvy punches for ovals and I still love them. I do have Nestabilities in rectangles, but for some reason I don’t use them as often as I should. And I still have no desire to replace my oval punches with oval nesties – I know many of you think I’m crazy – maybe I’m just resistant to change? It just seems so much easier to reach for a punch than to pull out a set of nesties (which I do not yet have stored properly), line it up and run it through the Cuttlebug. Hmmm…maybe I’m just lazy! LOL!
I’ll be back tomorrow to share my Dad’s birthday card. Thanks for stopping by. Happy Mother’s Day.
Recipe ~
Stamps: Spring Solitude, Short & Sweet
Paper: Bashful Blue, Garden Green, Spring Showers designer paper (SU Retired)
Plus: Chocolate Taffeta Ribbon, A Muse twinkle dots in gold, Marvy punches (Giga scallop oval, Mega oval, Super jumbo oval), distresser tool, ticket corner punch, markers – Chocolate, garden Green , Ballet Blue, Sakura Stardust pen
Divine Design for May
May 8th, 2008
It’s time once again for the Bible Verse Challenge. You can read Challenge details on SCS by clicking here – we’d love to have you join us any time. The idea is to make a card or page each month featuring a different Bible verse for memorization and meditation/prayer so that at the end of the year you have a completed project either for yourself or for a gift. I am making 5″ x 3 3/8″ journaling cards to fit into a Provo Craft mini top-loading tin.
Our Pastor has been teaching from the book of Proverbs and this Sunday he’ll be covering the Proverbs 31 Woman. I’m anxious to hear the sermon and decided to get a jump start by choosing Proverbs 31:30 as my verse for this month’s challenge.
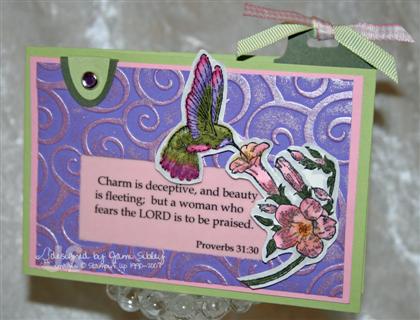
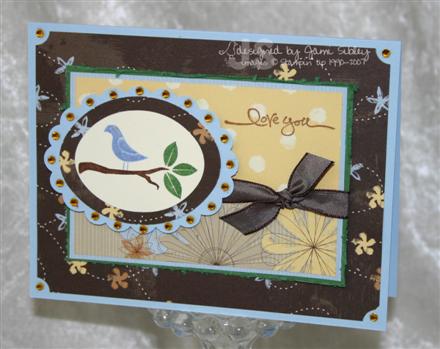
This hummingbird/flower image from Spring Song (SU) was one I had colored with Copics while watching a movie the other night. It was stamped on shimmer cardstock so the hummingbird has that irridescent effect I love. The Color Challenge on SCS this week is Lovely Lilac, Pretty in Pink and Certainly Celery so I went with that. I punched the window in the Lilac layer using a square punch multiple times. Then I ran that layer through my cuttlebug for the embossed swirls which I then rubbed with Brilliance Pearlescent Orchid ink. The verse was printed on vellum and adhered behind the window. The stamped image was cut out and attached with foam tape for dimension.
This verse is a good reminder to keep our priorities straight. Not that there’s anything wrong with beauty or concern for our appearance, but it’s important to keep in perspective the things that will last into eternity and to keep God before and above all other concerns. The Proverbs 31 Woman is a busy busy gal…nevertheless she has her head on straight and she keeps God first. With all she has going on, if she can do it what excuse could I possibly have?
I’m anxious to see what my fellow Scripture Chicks have created for the challeneg this month. Wanna join me in some blog hopping to check it out?
Nancy Morgan (hmmm…I’m not getting the link to work – hopefully one of the other chicks will have it linked. Sorry!)
Thanks for stopping by.
May Class – Part 2
May 5th, 2008
Happy Monday! I promised a cute and easy project, so here we go. For my third project in class Friday night I had originally planned to teach Reverse Spotlighting (to go along with the Spotlighting project – scroll down), but after struggling with two UGLY samples I gave up on that idea and decided to go with some super cute magnetic clippie frames made with coasters. (I can’t settle on what the heck to call them. LOL!)
I got the idea from my friend Debbie Jackson who used a similar project for her StampMania shoe box last year. She told me she got the idea from SCS so I really don’t know who originated it. First I made up a bunch of them for my friends who came from far and wide for StampMania. There is a group of us who chat almost daily – some of us for several years now. The group consists of about 20-25 women from around the country and there were 14 of us here for the SCSM weekend. I think that is the most ever in one place together.
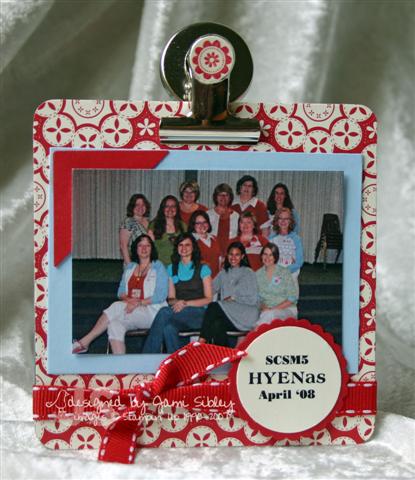
I made these red and white (actually it’s ivory in this retired SU designer paper) with a bashful blue accent to go with the SCSM color scheme. I packaged them up in cello bags with some blue curling ribbon for a simple presentation at dinner Friday night.

For class I decided it would be fun to cut up different papers so each person’s project would be unique. It was more work on my part but so fun to see the results! Start with a chipboard coaster. You can get these at restaurants like Chili’s and Outback Steakhouse (they will be printed) or you can get blank white ones from eclectic Paperie. I’ve found different versions of the magnetic clips at several places. The square ones I used for class (see photo below and the one on the right in the photo above) were from Office Max and come in a 6 pack for $4.29. For these you can use a 1″ circle punch to decorate them. The other type of clippie (left in the photo above of the red ones) is from Big Lots. Those come in a 2 pack for only .88 and you can decorate them with a 1/2″ circle punch.
Here’s a photo of the completed projects my girls made Friday night. Aren’t they cute?
 Click on the thumbnail to see it larger.
Simply cut 2 pieces of designer paper 4×4″ and use a corner rounder on all corners. Adhere the paper to the front and back (back is optional with the blank coasters) with glue stick. I gave everyone 2 coordinating colors of cardstock cut 2 1/2″ x 3 1/2″ – one of those pieces will be the photo mat and the other piece they used to punch both the scallop circle and the photo corner. They were also given a 16″ length of coordinating ribbon and one ink pad. I had Big Flowers and Riveting on the table. Riveting is retired and I would have prefered to use Circle of Friendship, but I don’t have it.
These will be perfect for a photo cropped to 2 1/4″ x 3 1/4″ or it would also be cute with a tiny tear off calendar. These would make great party favors. I honestly just love this project! And I feel it was well worth the extra time I took to allow each class participant to create something different and all their own! If you’ve made some of these leave me a link – I’d love to see them.
Last night I was craving cake so I busted out a devil’s food mix and baked one up in a 9×13 pan. The best part of a chocolate cake like that is eating a piece hot from the oven with butter on top. Curt loves it too, but he was laughing last night that I think it’s *normal*…apparantly other people don’t eat hot chocolate cake with butter? That’s just crazy! Growing up we didn’t have dessert every night after dinner – only ocassionally. Sometimes my aunt would bake a box chocolate cake and put it in the oven just before dinner was ready so it would be fresh and hot just when we finished dinner. We would slather it with butter and enjoy. Mmmmmm. Then the rest would be frosted the next day, but the frosted cake was never as good as the buttered cake. Am I the only one who loves hot buttered chocolate cake? If you haven’t tried it, you really MUST and then report back. Go on….right now…you know you have a chocolate cake mix in the cupboard. And it’s Monday – you deserve a treat! Mmmmmmmmmm.


