Tart & Tangy Tin Class
April 5th, 2008
Last night was my much anticipated class and I’m still recovering! LOL! It was really fun! I had 14 people registered, but after a couple of cancellations ended up with 12. That presented just a bit of a challenge with the space I have and with the particular project at hand, but I think I worked things out well and I hope everyone had a really good time. Class did take longer than usual and I just hope I didn’t scare or stress out the wonderful newbies who were here.
Two or three years ago I made this little notecard set for a StampMania doorprize.

The idea for little cards in an Altoids tin came from another sample I saw on SCS. Ever since I made that set I’ve wanted to do one in a class, so I was super excited to finally have my Tart & Tangy Tin Class last night. Here’s the full set of what we made.

The standard size card is CASEd from the one Sharon Johnson made for my last swap (thanks Sharon!) and we also stamped a cherry on a standard envie to match (not shown in this photo). The tin is a Peppermint Altoids tin (comes with the red band around the top). We made six mini cards (2 7/8″ x 1 7/8″) to fit inside the tin along with six envelopes made with an old SU envie template using plain copy paper and a couple of wheels (these could be left out). The tin will then fit inside the gift box for a completed gift set. The box is from tayloredexpressions.com – she has lots of cool favor boxes.
Here’s a close up of the tin.
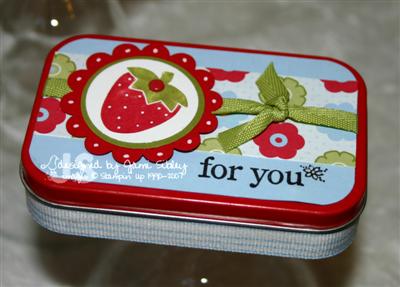
I love that thin Olive twill from the Ocassisons Mini Catty! It’s soft and ties up really nicely. We used the Bashul Blue striped grosgrain around the bottom portion of the outside of the tin.
Here are just the cards.

The Summer Picnic Designer Paper is to die for! And I’m loving that Tart & Tangy set! Those images are so easy to color with SU markers. Before using the set I thought that might be a bit of a pain, but it’s really quick and easy to color, huff and stamp! I had offered my class attendees a special on the set and two markers needed (Real Red and Old Olive) and several people took me up on it so we had at least 5 stamp sets on the table along with lots of markers which helped tremendously!
My logistics dilemma was planning a class for 14 people using 3 stations making a bunch of miniature stuff! For the main table where they made the mini cards here is what I ended up doing. I made a stamping chart so they could see how many total fruit images needed to be stamped out on a half sheet of Whisper White cardstock. I also made a chart of the fruit pieces punched out and layered so they would know how many of each colored cardstock punch was needed and how to assemble them. See the two thumbnails below and click on them if you want to see them full size.

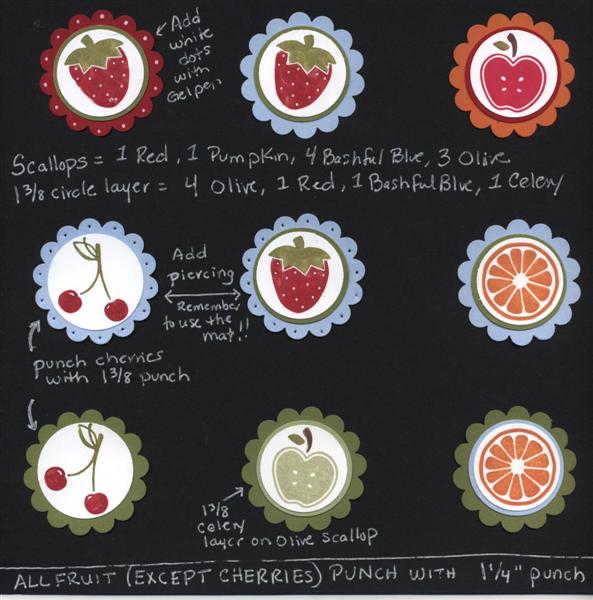
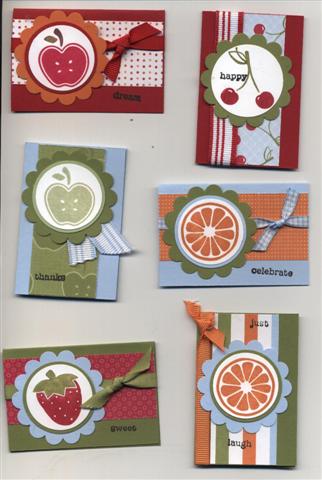
In addition to that I scanned the six mini cards (see 3rd thumbnail above) and had 3 of the scans printed out and on the table for everyone to refer to as they put their cards together. All of my customers LOVED this and found these charts super helpful, so that’s why I decided to share them here as well.
I was just as tickled as could be with the outcome of this project! I really think it’s much cuter in person that I could capture in the photos. If you decide to do something similar or teach a similar class please leave me a link to your gallery post or blog entry so I can take a look. So many projects in the SCS Tart & Tangy gallery contributed to the inspiration for this project and I’m so thankful to everyone who shares their work there!
Curt is at a car show today and I’m looking forward to a day in my PJ’s to hopefully get my stamp room cleaned up a bit and do a little stamping. Thanks for stopping by. Have a great weekend!

Basic Supplies for this project (forgive me if I don’t list every single item)
- stamps: Tart & Tangy, Everyday Flexible Phrases
- paper: Old Olive, Bashful Blue, Real Red, Whisper White, plus a litte Pumpkin and Celery, Summer Picnic Designer Paper
- ink: Black, Celery, Pumpkin, markers in Olive, Chocolate, Real Red
- other: punches- scallop, 1 1/4″ and 1 3/8″ circles, corner rounder; piercer and pad, red brads, white gel pen, various ribbon


April 5th, 2008 at 10:47 am
Jami!
These are SO cute! Thanks so much for sharing! I’m sure your class just loved it all.
Hugs, Alicia
April 5th, 2008 at 11:23 am
what a fabulous class idea! I think I might have to squeeze this in before Tart-n-Tangy is gone. Thanks for posting the charts and all the pics. These turned out so cute!
April 5th, 2008 at 12:26 pm
How adorable! I am sure all attendees absolutely loved this class!
April 5th, 2008 at 1:02 pm
Wow!!!! This ‘lil set is soooooo cute and honestly, I wasn’t crazy about the stamps when I saw them in the catty. They are wonderful here!
I bet everyone had a great time and the newbies had a great instructor, so I’m sure they have new skillz to use. More is more, ya’ know~ LOL!
April 5th, 2008 at 1:40 pm
Jami what an awesome set!! These are sooooo cute!! Wish I lived closer!!
April 5th, 2008 at 2:12 pm
Ooooh, Jami! What an adorable idea! I love those Altoids tins and finding new stuff to put in ’em, and I think that Tart & Tangy set is sooo yummy. Mine is in transit as I type! YAY!
April 5th, 2008 at 4:26 pm
No doubt everyone had a marvelous time at your class. Your projects are awesome.
April 5th, 2008 at 5:32 pm
Beautiful Cards sets – love them both!!
April 6th, 2008 at 4:46 am
THanks for all of the details of your class! Loved the charts! I’m sure everyone was tickled with the projects–I sure would be!
April 6th, 2008 at 2:35 pm
Neat project with the cute little cards. The charts were surely a hit-they would be so helpful as sometimes in a groups things can become a little garbled with talk, etc. Great idea-bet you are a wonderful instructor!
Bev J.
April 7th, 2008 at 5:14 am
Wow, I love this idea!!! I just wanted you to know that I appreciate you taking the time to share the details!! I don’t have the opportunity to go to all these cool classes and this helps!!! I love your work and enjoy viewing it daily!! Thanks again, Nancy
April 7th, 2008 at 9:57 am
This is so adorable! I’ve saved several of these Altoid tins with the idea to make cards to fit inside, but haven’t done it. Your post is inspirational! By the way, would it be possible for you to share the old SU envelope template? Thanks – Regina
April 7th, 2008 at 10:26 am
This set is absolutely GORGEOUS! I love the Tart and Tangy set too! I haven’t done much with it yet but am planning to!!! I am just curious about one thing….did you have to purchase multiple packs of the Summer Picnic paper to have enough for all the projects? I’ve not been able to use the designer paper for my workshops and classes because to use one or even two of the patterns I’d have to buy so many packages to have enough and I just don’t earn enough to make that feasible. And then I’d be left with lots of sheets of the designs in the package that I didn’t really care for! But since your set is kind of “mini – sized”, maybe you didn’t have that problem?
Anyway, just wanted to say how much I liked it and to say thanks for sharing!!
April 7th, 2008 at 4:25 pm
You know, I may have to copy you on this one. LOL How adorable is all of that.
April 8th, 2008 at 6:12 am
LOOOOOVVVVEEE these. I’m purchasing everything I need for them right now. Can’t wait to make them, thanks.
April 13th, 2008 at 8:03 am
Super cute class projects, Jami! And it looks like your charts made everything move along easily – great idea!
May 13th, 2008 at 8:37 pm
I love this set. Thanks so much for putting the link to tayloredexpressions for the boxes, that is going to make my life easier. Question to make the box as you did, do you use the pattern and copy it onto SU cardstock (real red and bashful blue?) Thanks so much, it’s an AWESOME set!!! Lisa
June 19th, 2008 at 10:36 pm
[…] ended up with 12.? That presented just a bit of a challenge with the space I have and withhttp://jami.blogs.splitcoaststampers.com/2008/04/05/tart-tangy-tin-class/CheerleadersJust the mention of being tickled made jami weak in the knees and giggly beyond … jami […]
January 14th, 2009 at 10:00 am
this reminds me of my bff william. he’s awesomely awesome and he loves strawberries! 🙂
April 5th, 2011 at 11:40 pm
hey nice post, their is something to learn from this article. best one from my article list.
April 26th, 2011 at 11:50 pm
Australia is a nice place to live
August 25th, 2012 at 1:13 am
This is my first time i visit here. I found so many entertaining stuff in your blog, especially its discussion.”LSH1988183″ .Cargo short pants . From the tons of comments on your articles, I guess I am not the only one having all the leisure here! Keep up the good work.
March 4th, 2013 at 9:43 pm
[…] More is More » Tart & Tangy Tin ClassApr 5, 2008 … Published by jami at 10:21 am under Stamped Stuff,Strictly Stampin’ Up! … I was just as tickled as could be with the outcome of this project! […]