Boating Down Memory Lane
August 6th, 2007
Today’s Technique Challenge on SCS is Paper Tole and references the tutorial for Paper Tole rolled flowers in the Resources section by the fabulous Dirty Girl Linda Duke. I love doing Paper Tole and the version I most often do is sometimes called Simple Tole. In fact this was a craft I did as a kid. I made lots of presents for grandparents, aunts, etc. Not too long ago I was going through an old dusty box of things that had belonged to my grandmother and I came across these 3 Paper Tole pictures I had done in 1974 and 1975 (I always dated the back of my work even as a kid!) I learned to do Tole from kits and then eventually just bought multiples of a print and cut and layered them with a goopy silicon type glue that would stand up in piles. These pieces are covered in dust and it’s really hard to get a photo that shows the dimension to them…

My favorite is this one with ticking fabric for the background and grosgrain ribbon around the edges. There is even a piece of terrycloth for the rug. I know I should have thrown these dusty old things away when I found them, but they are the roots of my papercrafting and I just couldn’t quite part with them.

And now here’s the card I made tonight for the Challenge. I kept the details very simple because I’m thinking I may teach this in my class Friday night and coloring and cutting out 4 boats will take a lot of time I think.

There really are four layers of boat there – I wish you could see it in person – I just could not get a picture to show the dimension, so I took a close up of just a section so you can at least get the idea.
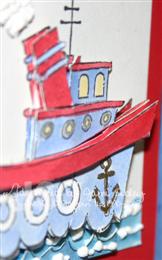 This is such a fun technique and really much easier than the finished product appears. Just takes some sharp scissors and a little time. I hope you’ll try it with more than just flowers. Thanks for going down memory lane with me tonight. I’m thinking it might be fun to photograph a tutorial of this technique. Let me know if that would interest you.
Card details:
Stamps: Boatloads of Love and Polka Dot Background
Cardstock: Ballet Blue, Night of Navy, Real Red, Confetti White
Ink: Black Pallette Hybrid
Method – colored with re-inkers and aquapainters. Cut 4 boats and layered in pieces – Simple Paper Tole
Details: Anchor colored with gold Zig Painty pen, portholes colored with silver Zig Painty pen, Liquid Applique on clouds, Liquid Applique and Dazzling Diamonds Glitter on waves, Red organdy ribbon
Thanks so much for dropping by.
Gift Giving
August 6th, 2007
*SIGH* I had a post all typed up and ready to go last night and when I hit “Save” it was *poof* GONE! I just didn’t have it in me to re-create it lat night, so I’m back this morning to try again.
I knew I had to get back to blogging after getting a call on my cell phone yesterday just as I was leaving church. It was my Mom – “just checking on you. You haven’t blogged in 5 days, is everything OK?” Now that’s BAD!!! Bwahahahahahahaha! I just didn’t have much time to stamp last week and I got into a bit of a blogging funk when my Stamping Top 50 icon and account disappeared into thin air. I had worked my way up to #72 and got pretty excited each time it jumped a notch. Curt would even call me from work sometimes to tell me my number. I know it’s dumb, but it was fun. When I started this blog I refused to install a visitor counter so I wouldn’t get too caught up in the numbers game, but I did decide to play with Stampers Top 50 anyway. I have e-mailed them with no response. Last night I learned that this has happened to several friends as well, so I guess I need to just let it go.
I had a couple of little gifts that needed to be wrapped, so I thought I’d share what I came up with. The first one is a very simple genie bag.

Last year I made my friend Brenda a lunch tin with dividers and a variety of greeting cards. Now she’s in need of a *refill* so I came up with some cute cards using retired sets that I can no longer use on my Demo display board. Usually I make the mini genie bags with the tiny white lunch sacks and quarter sheets of cardstock, but this time I started with a full size white lunch sack cut down to a height of 6 inches. This fits a dozen cards and envelopes perfectly. I attached Real red cardstock (6.25″ x 7″) to front and back and punched handles with the SU large oval punch (3 times slightly overlapping). Velcro dots were added on both sides of the handle to keep the filled bag closed. The bag was decorated with some Fancy Pants designer cardstock and Maya Road chipboard monogram covered with the other side of the Fancy Pants paper. Easy peasy. My only question is…why did something this simple take me 4 days to complete? LOL!
This next project is for Brenda’s daughter Sarah. She recently had a birthday and we bought her a gift certificate. It was an *old fashioned* paper GC and rolled up it fits nicely in this band aid tin. I love decorating band aid tins – they are just so cute!
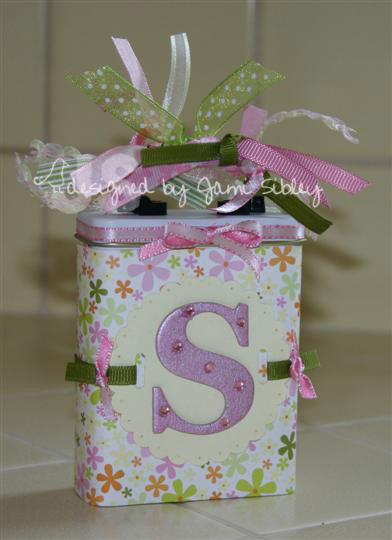
Again this is a super simple project. I started by covering the tin with Heidi Grace (Flower Flower) dp from eclectic Paperie using sticky strip. Then I punched a Marvy scallop circle from some coordinating soft yellow Prismatics textured cardstock and punching slots in the circle for the ribbon to slide through. The monogram is Maya Road (New York Upper Case) chipboard which I *painted* with Brilliance Pearlescent Orchid ink dtp – it gives such a shiny/pearly finish – I love it! AMuse twinkle dot stickers finished off the monogram and the whole project was completed with a bunch of ribbon from my stash.
If you haven’t decorated a band aid tin you really need to. It’s so cool that they are readily available at eP now. When I was first buying them it was so hit and miss to try and find them. You can also get them sometimes at www.creativexpress.com. A standard size gift card also fits niceley in them and I’m sure you can come up with a bunch more ideas. They are super cute done up for Halloween or Christmas!
Sorry I was out of touch for so long. I do plan to post again tomorrow so please check back. Thanks for stopping by!


