More Cupcakes!
May 19th, 2007
How blessed I am to have such great stampin’ buddies! Today a small group of us got together to *stamp*. Ok, it was mostly to chat, very little stamping occurred. Joy and Daisy just got the brand new Cricut (a demo model) that will be available in June at eclectic Paperie. They brought it over and unpacked the box here. How lucky am I??? A good part of the afternoon/evening was spent playing around with it. It cuts 12×12 paper! From what we could gather today it does not cut chipboard, but is wonderful on all types of cardstock and acetate. I’m sure Daisy will post more info about it soon on her blog. There are so many super fun cartridges for it!
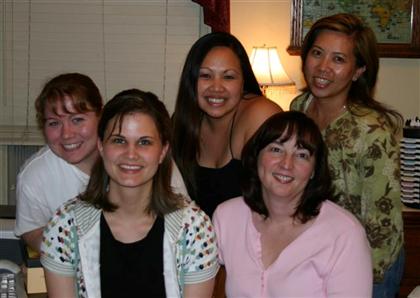
Jen, Taylor, Joy, me and Daisy
We worked on projects a bit, talked, played with the Cricut, talked, ate pizza, talked, ate cupcakes, and talked!

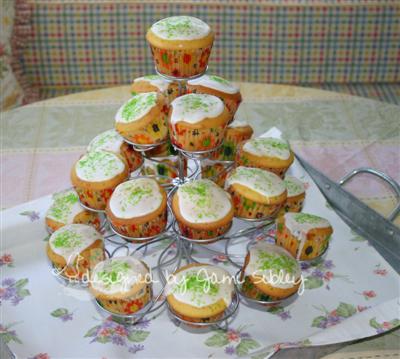
Here are the Red Velvet cupcakes I made for today with whipped Cream Cheese icing. Mmmmm. I wanted them to look like so many cupcake stamp images which always seem to have a cherry on top, so I topped each one with a red M&M (the dark chocolate ones)! Yummy!!!
I started a Chantigo Monkey card while everyone was here, but the pizza arrived and I never finished it…maybe tomorrow. I also need a wedding card to take to work with me on Tuesday. Hopefully I’ll find some time to stamp tomorrow. As much as I love getting together with people, the only thing I can usually accomplish is working on repetitive projects like batches of Christmas cards. To actually create something though, I guess I need to be alone. Curt worked super hard outside all day on a backyard clean up project so I have a feeling that after church tomorrow we may be laying low around the house, which suits me fine. Hope y’all are having a fabulous weekend!
Orange? Really?
May 18th, 2007
As I was going through my card stash looking for something to mail to a friend today, I came across a card I made last year that I really liked that was made with a Kaleidacolor Pad. I have a fairly extensive collection of K-pads and SU Spectrum pads and have always loved them, but I haven’t used them lately. I suddently felt inspired, so I pulled out Mixed Bouquet and my Bouquet K-pad. I started by just stamping images on Whisper White cardstock to create a main panel for a card. When I got done it seemed a little too bright for me so I decided to mute it with a piece of vellum cardstock. Ah..that’s better! On the vellum I stamped the rose outline image with Not Quite Navy classic ink. When it was dry I went over the outline with my Sakura Quickie Glue Pen (that thing is awesome!) and Dazzling Diamonds Glitter. The vellum was attached with little dots of Scotch Tacky in all four corners. My intention was to then put gems in each corner but as it turned out I didn’t have 4 matching gems and you really can’t see the glue so I left it as is. That panel was matted on NQN cardstock.
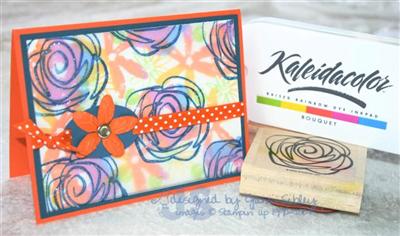
Now here’s the really weird part. I needed to choose a color for the card base and I went straight to Only Orange. *head spinning* I never use Only Orange. I don’t like Orange….or even peach. Nonetheless it seemed like the obvious and correct choice. That is one of the fun things about using a K-pad – the color combo is selected for you and it’s often not something you would have thought up on your own!
Card was finished up with some orange polka dot grosgrain I had left over from a Halloween project (no kidding!) and a slide made with my Cuttlebug, covered with a Prima and a yellow rhinestone brad.
Tomorrow afternoon I have a few stampin’ buddies coming over. 🙂 Cupcakes have been baked and will be frosted in the morning. Hope you have a terrific weekend.
And I want to give a huge shout out and Happy Birthday to my friend Lori Craig! Hope you have a superb celebration! Can’t wait to see what you do with that new camera!
Makin’ it up as I go along!
May 17th, 2007
Once a month I teach a stampin’ technique class at my house. I try to plan a month or two ahead, but due to circumstances I often end up planning my projects a few days before class. In April I had decided that along with the techniques each card would be some sort of “fancy fold”, such as the stand up tri-fold in the post below. Way back in January I got a card in a swap from my friend Britta (camsmom on SCS) that I had been saving as inspiration. I just love the pocket fold she used and the bright happy feeling of it. That led me to create this:

and here’s a shot of the inside with the pull-out card:

I bet you can’t guess what technique I was teaching! No really, I’m sure you can’t! Because I, uh, kind of…made it up! LOL! Here’s what happened. I had planned for awhile to teach Smackin’ Acetate. So what if I’d never done it before? I had read plenty about it. So I made this card and was very happy with the results. In my technique classes, students also get to make a reference card with printed directions so imagine my surprise when I went searching for the Smackin’ Acetate directions and discovered what I had done was NOT Smackin’ Acetate at all! Oops! So I did a little more searching and in the Demo Only Gallery at SCS I saw a technique called Ink, Spray & Mash and realized that a card by flowerbugnd1 had inspired me, but I wasn’t exactly doing that technique either – although I was getting closer! OH MY HEAVENS!
I tried to re-do my card using Smackin’ Acetate, but I just wasn’t happy with the results. SA uses markers and I was using re-inker – much bolder look. I liked it the way I had already done it….so I decided I just needed to teach the technique the way I had already done it and make up a name for it! I know I didn’t actually make up this technique, since I was sure I was doing something I had read about previously, but I couldn’t find it anywhere exactly as I was doing it and I had a class to teach! And that is how Acetate Tie Dye came to be. It’s a little bit messy, but it’s fun and gives a cool result. It requires glossy cardstock. Here are the directions:
Fold an 8.5×11 sheet of acetate in half. Open and apply 4-5 drops each of 3 colors of Classic Dye Re-inker. Mist lightly with water. Close acetate folder and brayer to blend color somewhat. Take 2 quarter sheets of glossy cardstock back to back so glossy sides face out. Open the acetate folder and place the glossy cardstock inside. Close and brayer again. Remove glossy cardstock from acetate folder and allow to dry completely – heat set if in a hurry. Stamp as desired.
The ATD was used for the bottom panel of the pocket card as well as for the cut out Doodle This flowers. The re-inker colors I used were Lovely Lilac, Tempting Turquoise and Pixie Pink.
To make the pocket card I started with a 5.5″ x 8.5″ piece of Lovely Lilac cardstock. Score at 2.5″ and again at 6.25″. Fold up from the bottom at the 6.25″ score and cover that part with an ATD panel. Attach inside with brads. Fold down from top at the 2.5″ score and round the corners. Cover that panel with Basic Black cardstock and decorate. Pull-out card inside pocket is 4″ x 3.25″ and the top corners are rounded. On the original card by Britta her pocket base was black which was super cool! I just couldn’t make that work with my design. This fold is super easy, but gives a very impressive end result. Give it a try. And if you feel like getting a little ink on your fingers try Acetate Tie Dye and let me know how it goes! I’d love to see your samples! 🙂
Stampin’ When I Can!
May 16th, 2007
I didn’t think I would get to stamp at all this week, but I managed to get a couple of hours of stamp-room-exile this morning while the housekeepers were here. Even though my stamp room is so piled up that I can’t even walk around or get to my desk I did manage to carve out a small space on my table and find a way to get to my chair! YEA! I made several cards, so I will have some stuff to share the next couple of days.
The first card I want to show you is one we did in my technique class last Friday. With this card I taught Faux Framing.
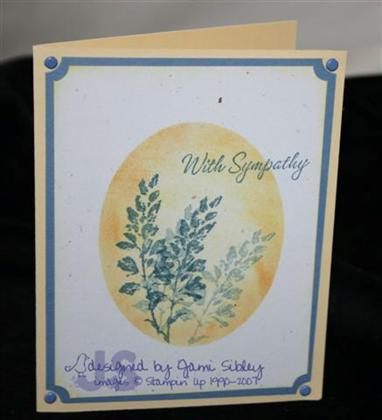
Faux Framing is such a simple and pretty technique! Just cut or punch a shape out of some copy/printer paperto use as a stencil – in this case I used my coluzzle to cut an oval – then sponge color inside the shape and stamp your image. Here I sponged Barely Banana and Marigold classic inks and then stamped Petal Prints in Buckaroo Blue. Petal Prints is another set I hate to see retire. I kept this card very simple and calm since I don’t think bling and glitter are appropriate for sympathy cards.
Since I had Faux Framing on my mind I made this card this morning.
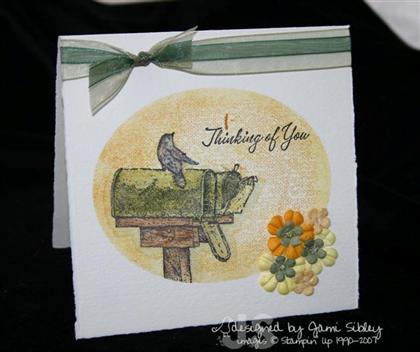
Again I used the coluzzle to cut and oval and this time I sponged Barely Banana and More Mustard directly on a square Fabriano notecard. Then I overstamped with the Linen Background inked with More Mustard. This beautiful image from Song Birds (another favorite set that is on *the list* boo-hoo!) was stamped in Palette Hybrid Noir Black ink and watercolored with watercolor crayons. Two shades of green organdy ribbon and some prima flowers finish off this simple no layers card.
And now I’m late for work and have to run. Happy Hump Day!
Cupcakes and Flowers
May 13th, 2007
This afternoon we had a little Mother’s Day BBQ out in our backyard. It was a simple dinner – one of my very favorites – steak, baked potato, corn on the cob and fresh cheddar sourdough bread. For dessert I made lemon cupcakes. This time I just used a box cake mix (even though I do enjoy baking from scratch) with old fashioned glaze made from sifted confectioners sugar and fresh squeezed lemon juice – yummy!
It was just 7 of us – me and Curt, my Mom and Dad, my uncle and his *lady friend*, and my stampin’ pal Jen. This coming Friday the 18th will be one year since my aunt (who raised me) passed away at the age of 87 after battling illness (including Alzheimers) for 3 years. Today was the first time for my uncle bringing his *friend* to a family gathering. I was a little worried that it would feel weird. I mean I’m thrilled for him – honestly…but I just wasn’t sure how it would feel to see him with someone other than my aunt. It was fine – really fine. He deserves every happiness and it wasn’t weird at all, just a very pleasant afternoon!
Here’s the Mother’s Day card I made for my Mom. It’s a stand up tri-fold – one of my favorite layouts to work with. It’s such a simple fold too. Just fold like a normal card and then take the front panel and fold it back in half. Then take a piece of 4″x 5.25″ designer paper and cut it half at 2″. Adhere it to the card so the pattern matches – this way the fold isn’t obvious when the card is closed. Then just an add a panel centered on the closed card, but only adhered to the left half.
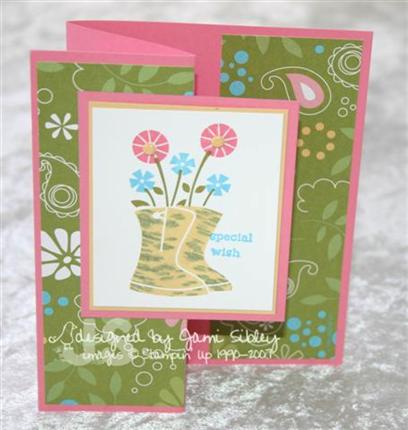
We did this card in my April technique class to illustrate thumping. The boots from Flower Filled were inked in So Saffron and then the Olive marker was tapped/thumped onto the image to create a multi-colored effect. I just got this set recently and I’m a little sad it’s retiring. I really need to spend a lot more time playing with it! Colors for this card (Regal Rose, So Saffron) were taken from Petals & Paisleys designer paper. This week I hope to share a few more of my class cards with you, since it looks like I won’t have much chance to stamp.
Hope you had a fantastic weekend. Thanks for stopping by.
TGIF
May 11th, 2007
Just finished my monthly technique class a little while ago and I’m exhausted! It’s always fun and I’m always waaaaay tired when I’m done. Thought I’d share one of the cards we did before I crash for the night. This was the “bonus” card – so no particular technique here.
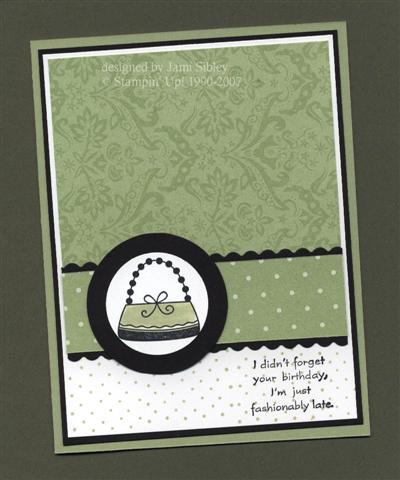
I wanted to highlight First in Fashion – a set that I think is retiring too soon after only one year in the catty! Also wanted to highlight the new Palette o’ Prints 6×6 pad. This was a fun card because I had it prepped in all 4 colors (celery as in the sample, rose red, amethyst and saffron) – 1 or 2 each. It was great to see the results in the different color options. I am really LOVING this paper pad! This is a pretty straight forward card I think and honestly I’m just too tired to type the details, but I think you get it, right? Layout was inpsired by cards awhile back on Michelle Wooderson’s blog.
Busy weekend ahead. I hope you all have a happy Mother’s Day!
Guilty Pleasure
May 9th, 2007
Why is it that some of my most fun and creative stamping takes place when I know I should be doing something else? Sort of a *guilty pleasure* thing. Today I had some specific tasks to accomplish like paying bills and get samples ready for the Technique Class I’m teaching Friday night. But as I walked into my stamp room to put R.B., our Green Wing Macaw, in his cage I spied some A Muse note cards sitting on my desk and this card suddenly popped into my head. I felt like I would explode if I didn’t sit down and make it right then! It was a fairly quick card and I was super happy with how it turned out. And so…I never did completely finish my class samples (they’re almost finished), and so I was paying bills at 8:00pm. I really do need lots of birthday cards, so I actually did accomplish something…even if it wasn’t on my list!
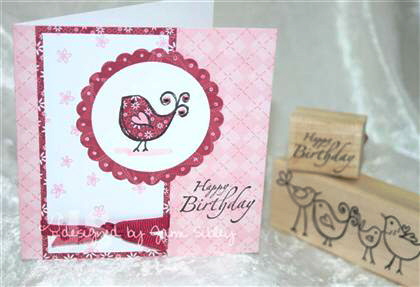
Card base is an A Muse note card from an assorted pack I have and the little white panel with the pink flowers is also from A Muse – an assorted pack just that size for layering on cards. The Rose Red designer paper is from the new SU Palette Prints 6×6 pad. I love that pad! It’s so much prettier in person than the pictures I had seen. The birdie image is from Magenta and as you can see it is a row of 4 birds. I inked just one of them and stamped it on Whisper White cardstock. Then I stamped again on the Rose Red dp and cut out and adhered over the white bird. I stamped one more time on Pretty in Pink cardstock and just cut out the wing and adhered it on top. The birdie was finished off with A Muse Creative Candy twinkle rhinestone stickers on his tail and a little swath of pink marker to ground him. Mega Scallop Circle in the Rose Red dp (other side of the same sheet) was pierced all around and dotted with a white gel pen. Sentiment is from the SU set It’s Your Birthday. Ribbon is from Fabric Barn in Long Beach.
Hopefully I wil have some class samples to share in the next day or two. Thanks for stopping by.


