Paint Can Saga
April 15th, 2007
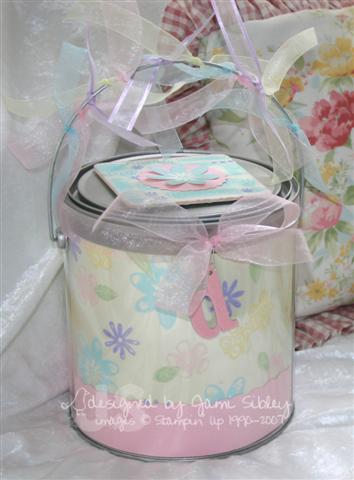
What a lovely Sunday! Today I got to do one of my favorite things – spend the afternoon in a Tea Room with friends. There is nothing better than a beautiful Tea – scones, tea sandwiches, chocolate and a variety of teas enjoyed over the course of a couple of hours or more. Bliss! The occassion for Tea today was to celebrate all the birthdays in my prayer group PACT. We each buy a gift for one other person in the group. I wrapped my gift in a large clear paint can by Stampendous from eclectic Paperie.
 I hesitate to tell the story of decorating this because it is truly so goofy I’m not sure you will believe it. I wasn’t feeling well and it was geting late last night and this needed to be done. I had a vague notion of what I wanted, but no idea how to acheive it and almost no time to experiment. I remembered seeing a paint can Taylor had done for Easter and she stamped right on the clear acetate of the can itself. I wanted that look but was way too chicken to try that. Ahhhh I’ll stamp on acetate sheets and just place them inside. So I started stamping with Versamagic Chalk inks having absolutley no idea if they would dry on acetate. *insert eye roll* When I finished the stamping, I liked the pattern I had acheived but I had no time to see if the ink would dry. Hmmmm….I’ll just cover it with another sheet of acetate. How will I attach it? No time to think – just use some Scotch Tacky adhesive. I wanted a cream/ivory background so the stamping would show up more…hey..how about that Prismatics cardstock by Prism Papers? I cut some of that in Butter Cream, but it wouldn’t sit in the can nicely behind the acetate. Sooooo I glued the acetate right to it. Did I mention that I was not feeling well? Due to some measuring miscalculations there was a weird bottom edge – OK – cover that with some Frosted Pink Prism Paper cut with some decorative scissors. At this point you may be wondering why I didn’t just stamp directly on the Butter Cream cardstock, however I have convinced myself that that would have looked all together different.
On to the lid. I had nothing that would cut a circle that big, so I used the old-fashioned trace and cut and cut some more and ended up with a pretty sad looking circle. I stamped the circle with the flower image from The World Over (SU) and proceeded to color it with Prisma pencils and stuck it on with Sticky Strip. Still not feeling well by the way. Covered the ugly edges by easing around some cute pink felt ric rac. But what’s that you say? You don’t see that in the picture? Perhaps that’s because I stuck it to the WRONG SIDE of the lid!!! No kidding!
At this point I am tired and frustrated and still not feeling well. Ok let me leave the lid alone for a minute and work on a tag of some sort. Hmmm….how about a coaster tag. I took some of the Butter Cream cardstock and ran it through the Cuttlebug with the Happy Birthday embossing folder and sponged it with some of the Versmagic ink and attached to both sides of a coaster. Punched a scallop cirlce out of the pink and stamped and cut out a flower. The intention was to hang this from the can somehow, but I was compeletely out of umph. I decided to leave it til morning (which is really funny since I’m NOT a morning person and knew I had very limited time this morning).
Sunday dawns. Stick the “tag” to the lid, add some ribbons and a Lil Davis pink chipboard letter and call it good. Oh my heavens! Not exactly what I had in mind, but at the rate I stamp what I had in mind would have taken me a week! Of course my friend thought it was cute (including that I decorated inside the lid! LOL!) and I just acted like I whipped it up no big deal! A better woman would have put it aside to start over on another time and just used a gift bag today, but not me – I’m way too stubborn for that! *grin*


April 15th, 2007 at 9:25 pm
Oh Jami, what a cute story! Well, I’m sure YOU don’t think its cute, but I sure do! 🙂 The can turned out so cute. I just love it!
April 15th, 2007 at 9:56 pm
I concur with Joy! It really did turn out so very cute, in spite of the trials you dealt with to get there. And btw, it just sounds so like what would’ve happened with me attempting it & being determined this IS how the gift will be presented. Your end result is wonderful! TFS
April 15th, 2007 at 10:15 pm
It takes a lot of talent to keep going and end up with a sucessful project! When I make a mistake and try to recover from it, things just go further downhill.
April 16th, 2007 at 3:38 am
It is a beautiful can!! Sorry for not feeling well through the process, but truly beautiful!!!
April 16th, 2007 at 4:54 am
The can ended up really awesome! I was laughing so hard reading your story – how many times have we been tired and done silly things like decorate the inside of a can instead of the top!?!?! One scrapbook night my girlfriend was so tired she placed her oval cutter on her photo -on top of the background paper- and cut out her photo and also left behind a huge oval cut on her BG paper – not where she wanted it. We laughed so hard we started to cry! Thanks for sharing your story, and bringing back funny memories!
April 16th, 2007 at 7:57 am
Jami… you crack me up! Sometime you gotta try stamping directly on the can… super easy! 😉
April 16th, 2007 at 8:16 am
OMGoodness, Jami your’re hilarious! Well the final product is gorgeous, no matter how you got there!
April 16th, 2007 at 8:18 am
HILARIOUS story!!! ADORABLE paint can! You should have more ‘bad’ stamping days!! LOL
April 16th, 2007 at 12:32 pm
Great story, and such a cute can!!!
April 17th, 2007 at 5:06 am
Aww, Jami! What a rough time you had girl when you were already feeling down. If it makes you feel any better—your paint can is absolutely adorable! I would have been very pleased to get something so cute! Very springy too with those soft colors.
April 17th, 2007 at 6:24 am
I love that story! It sounds like so many of my projects, especially since I don’t really plan them, I just go for it (and fix along the way). And what a wonderful result, no wonder your friend was so pleased.
April 17th, 2007 at 2:24 pm
Oh, my gosh, Jami! I’m sitting here laughing out loud!!! You poor thing–but you sound so much like me! Tee hee!! It did turn out really cute and I know she loved it. That’s especially funny that she was so impressed that you decorated the inside of the lid! Oh, my gosh! My sides are splitting!!! Love you to pieces, Jami!
April 17th, 2007 at 3:30 pm
Jami ~ You crack me up! The can is absolutely adorable!
April 17th, 2007 at 3:56 pm
Darling can. And your story is too fun — Can I relate to that!
April 17th, 2007 at 9:52 pm
Wow, what a story. If this is what you come up with when you aren’t feeling well…..I hope I get sick soon. LOL
April 17th, 2007 at 10:12 pm
Oh my goodness, Jami! I’m so sorry, but I can’t stop giggling!
It is a darling paint can! And what a lush touch to decorate the inside of the lid, too! 😉
April 18th, 2007 at 1:19 pm
OK Jami, That is how I stamp! Doesn’t everyone???
It turned out really cute. Kathy