Basic Grey Blocks
February 26th, 2007
I got the idea for this fun simple project from the February 07 issue of Sunset Magazine. Sunset is a regional magazine about Living in the West. It has great travel, decorating, gardening and food articles…and apparantly the occassional craft! If you live in the Western United Sates you NEED this magazine! As soon as I saw the picture in Sunset I asked my sweet hubby if he would cut me some wood blocks. He ran right over to Home Depot and picked up a piece of 4×4 – which interestingly enough is 3.25″ x 3.25″, but it’s called a 4×4. I guess that’s not so different from 12×12 paper often actually being 11 7/8″x 11 7/8″, huh?
We fiddled with the heights and came up with 2.5″, 3.25″, and 4.5″. I proceeded slightly differently than the magazine directed. They suggested wrapping one piece of paper all the way around the block, but I was afraid it would get funky at the corners. I opted to start by painting all the edges with 2 colors of brown acrylic paint (you know the little bottles that go on sale at Michael’s 2/$1.00) and then with a touch of aqua acrylic paint.
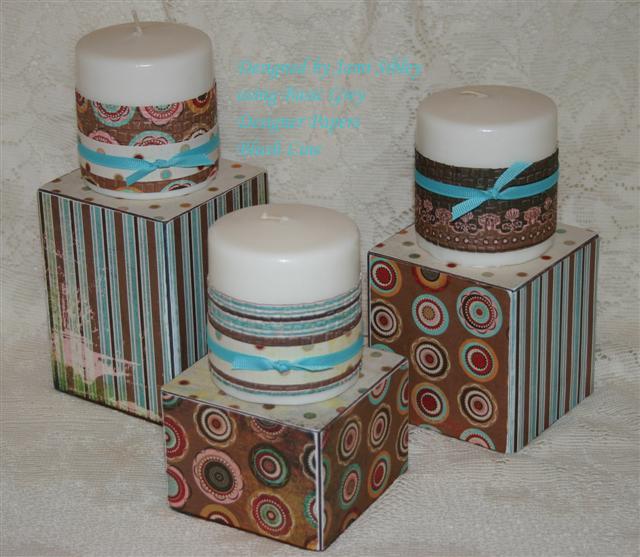 Then I cut pieces of Basic Grey Blush for all 4 sides and the top of each block. Each one is the same with the stripe on 2 adjacent sides and then the circles on the other sides and the polka dots on top. (This way the blocks can be displayed a number of different ways – all the same or showing different patterns as in this photo.) I adhered with Plaid Royal Coat Decoupage Finish. It is basically the same as Mod Podge but I find MP often has a tacky feel when used as a top coat – even when fully dry. I don’t get the tackiness with Royal Coat. After they were compelety dry I used a fine grit sand paper to sand all the edges. I had intended to apply more RC as a top coat, but liked the look and feel of the bare paper so I stopped at that. Of course a top coat would make them more durable.
The candles are from Big Lots and come in a 2 pack for $2. I cut strips of BG Blush 1.75″ and ran them through my Cuttlebug with the Tiny Mosaic A2 folder – hard to see in the photo, but gives a really nice texture. Then wrapped a smaller piece of the polka dot Blush pattern and finished with some Caribbean grosgrain ribbon from Fabric Barn.
I am so in love with Basic Grey papers right now even though I feel like I have been cheating on my big background stamps. LOL! I can’t wait to get the Phoebe, Perhaps, and Stella Ruby lines today. I am so excited for my friend Joy and her wonderful business partner Daisy with the opening of their on-line store electic Paperie! Check it out! They have some amazing stuff already including lots of Basic Grey, Crate, and Cosmo Cricket and are getting new stuff in almost every week right now. You definitely have to check out their alterables section. I got to see the Bare Elements stuff in person at CHA and it ROCKS!
I hope some of you will try this candle block project. If you do, please let me know so I can see what you’ve done. I think it could be great for just about any seasonal decoration and definitely easy enough for the kids to do with you as well. If I planned to burn these candles I would just burn down a bit and scoop out a small hole so that a tealight would fit on top. That way it’s safer and the tealight can be replaced.
Thanks for visiting my blog today. I’m just getting started and would love for you to leave me a comment! Happy Monday. 🙂


February 26th, 2007 at 10:26 am
Love, Love, Love them!!!!! *wonder if I can get Mark to cut me some wood* 🙂
Loving the Blog, Jami!
🙂
February 26th, 2007 at 11:30 am
Jami – These are so cool and so pretty. I ALWAYS learn something from you. I’m planning to do a local craft bazaar in November and had been thinking about something to use that would be colorful and varying levels to set items for sale on – these are just what I need! And plenty of time to make them. (Although I’d have to use SU paper.) I agree with you about the Basic Grey paper – it’s so pretty.
February 26th, 2007 at 3:32 pm
woooooooooooooooooooooooooooooooow. dirty girl this is GREAT! *sigh* i love the basic grey paper even more when it is used on projects like this. I agree about the new Phoebe line. *swoon*
February 26th, 2007 at 8:56 pm
Hi Jami, I caught this link from someone else’s blog! I love your site…cute project, too! I wondered if you would catch the blogging virus! Kathy
February 27th, 2007 at 9:23 am
WOW! this is great, thanks for sharing, i’ll definitely have to try this. Now, i need to go to home depot and get some 4 x 4 🙂
February 27th, 2007 at 1:40 pm
Jami~I commented on these in your SCS gallery, but I will say it again-these are totally gorgeous & a must-do project for me. (As soon as I can get to Home Depot for the wood. BTW, I did NOT know 4x4s were not actually 4×4, and my Dad is a carpenter!)
February 27th, 2007 at 6:41 pm
These are wonderful Jami! I’m going to consider these for my next stamp camp.
The 4×4’s are cut smaller to gain more yield from the tree and cost less. If they were a full sawn 4×4 there would be a noticeable cost difference. Most of the time when a 4×4 is ordered it comes as 3.25×3.25 or 3.5×3.5 and this is referred to as nominal difference. Is that more than you wanted to know?
February 28th, 2007 at 3:20 pm
Very cool, Jami! I’ve seen these candle blocks before, but not anything so crafty and cute as this–just “store bought” ones. Love yours! Thanks for a great gift idea!
March 2nd, 2007 at 12:13 pm
Gorgeous. The copper cuttlebug card is to die for! Thanks for the shout out for my neurotic post. It must be a woman thing!! LOL